- 원본 링크 : https://keras.io/examples/generative/dreambooth/
- 최종 수정일 : 2024-09-03
DreamBooth
목차
- 소개
- 초기 imports
- DreamBooth 사용법
- 인스턴스 및 클래스 이미지 다운로드
- 이미지 시각화
- 데이터세트 준비
- 이미지 준비
- 데이터세트 모으기
- 모양 확인
- DreamBooth 트레이닝 루프
- 트레이너 초기화
- 트레이닝!
- 실험과 추론
- Acknowledgements
저자: Sayak Paul, Chansung Park
생성일: 2023/02/01
최종편집일: 2023/02/05
설명: DreamBooth 구현.
ⓘ 이 예제는 Keras 2를 사용합니다.
소개
이 예에서, 우리는 3~5개의 이미지만으로, 텍스트 조건화된 확산 모델에 새로운 시각적 개념을 가르치는 미세 조정 기술인, DreamBooth를 구현합니다. DreamBooth는 Ruiz et al이 DreamBooth: 주제 중심 생성을 위한 텍스트-이미지(Text-to-Image) 확산 모델 미세 조정에서 제안했습니다.
DreamBooth는, 어떤 의미에서, 텍스트 조건화된 확산 모델을 미세 조정하는 기존 방식과 비슷하지만, 몇 가지 단점이 있습니다. 이 예에서는 확산 모델과 이를 미세 조정하는 방법에 대한 기본적인 지식이 있다고 가정합니다. 다음은 빠르게 익숙해지는 데 도움이 될 수 있는 몇 가지 참조 사례입니다.
- KerasCV에서 Stable Diffusion을 사용한 고성능 이미지 생성
- Textual Inversion을 통해 Stable Diffusion에 새로운 개념 가르치기
- Stable Diffusion 미세 조정
먼저, KerasCV와 TensorFlow의 최신 버전을 설치해 보겠습니다.
!pip install -q -U keras_cv==0.6.0
!pip install -q -U tensorflow
코드를 실행하는 경우, 최소 24GB의 VRAM이 있는 GPU를 사용하고 있는지 확인하세요.
초기 imports
import math

import keras_cv
import matplotlib.pyplot as plt
import numpy as np
import tensorflow as tf
from imutils import paths
from tensorflow import keras
DreamBooth 사용법
… 매우 다재다능합니다. 좋아하는 시각적 개념에 대해 Stable Diffusion을 가르치면 다음을 할 수 있습니다.
-
흥미로운 방식으로 사물을 재문맥화(Recontextualize)하기
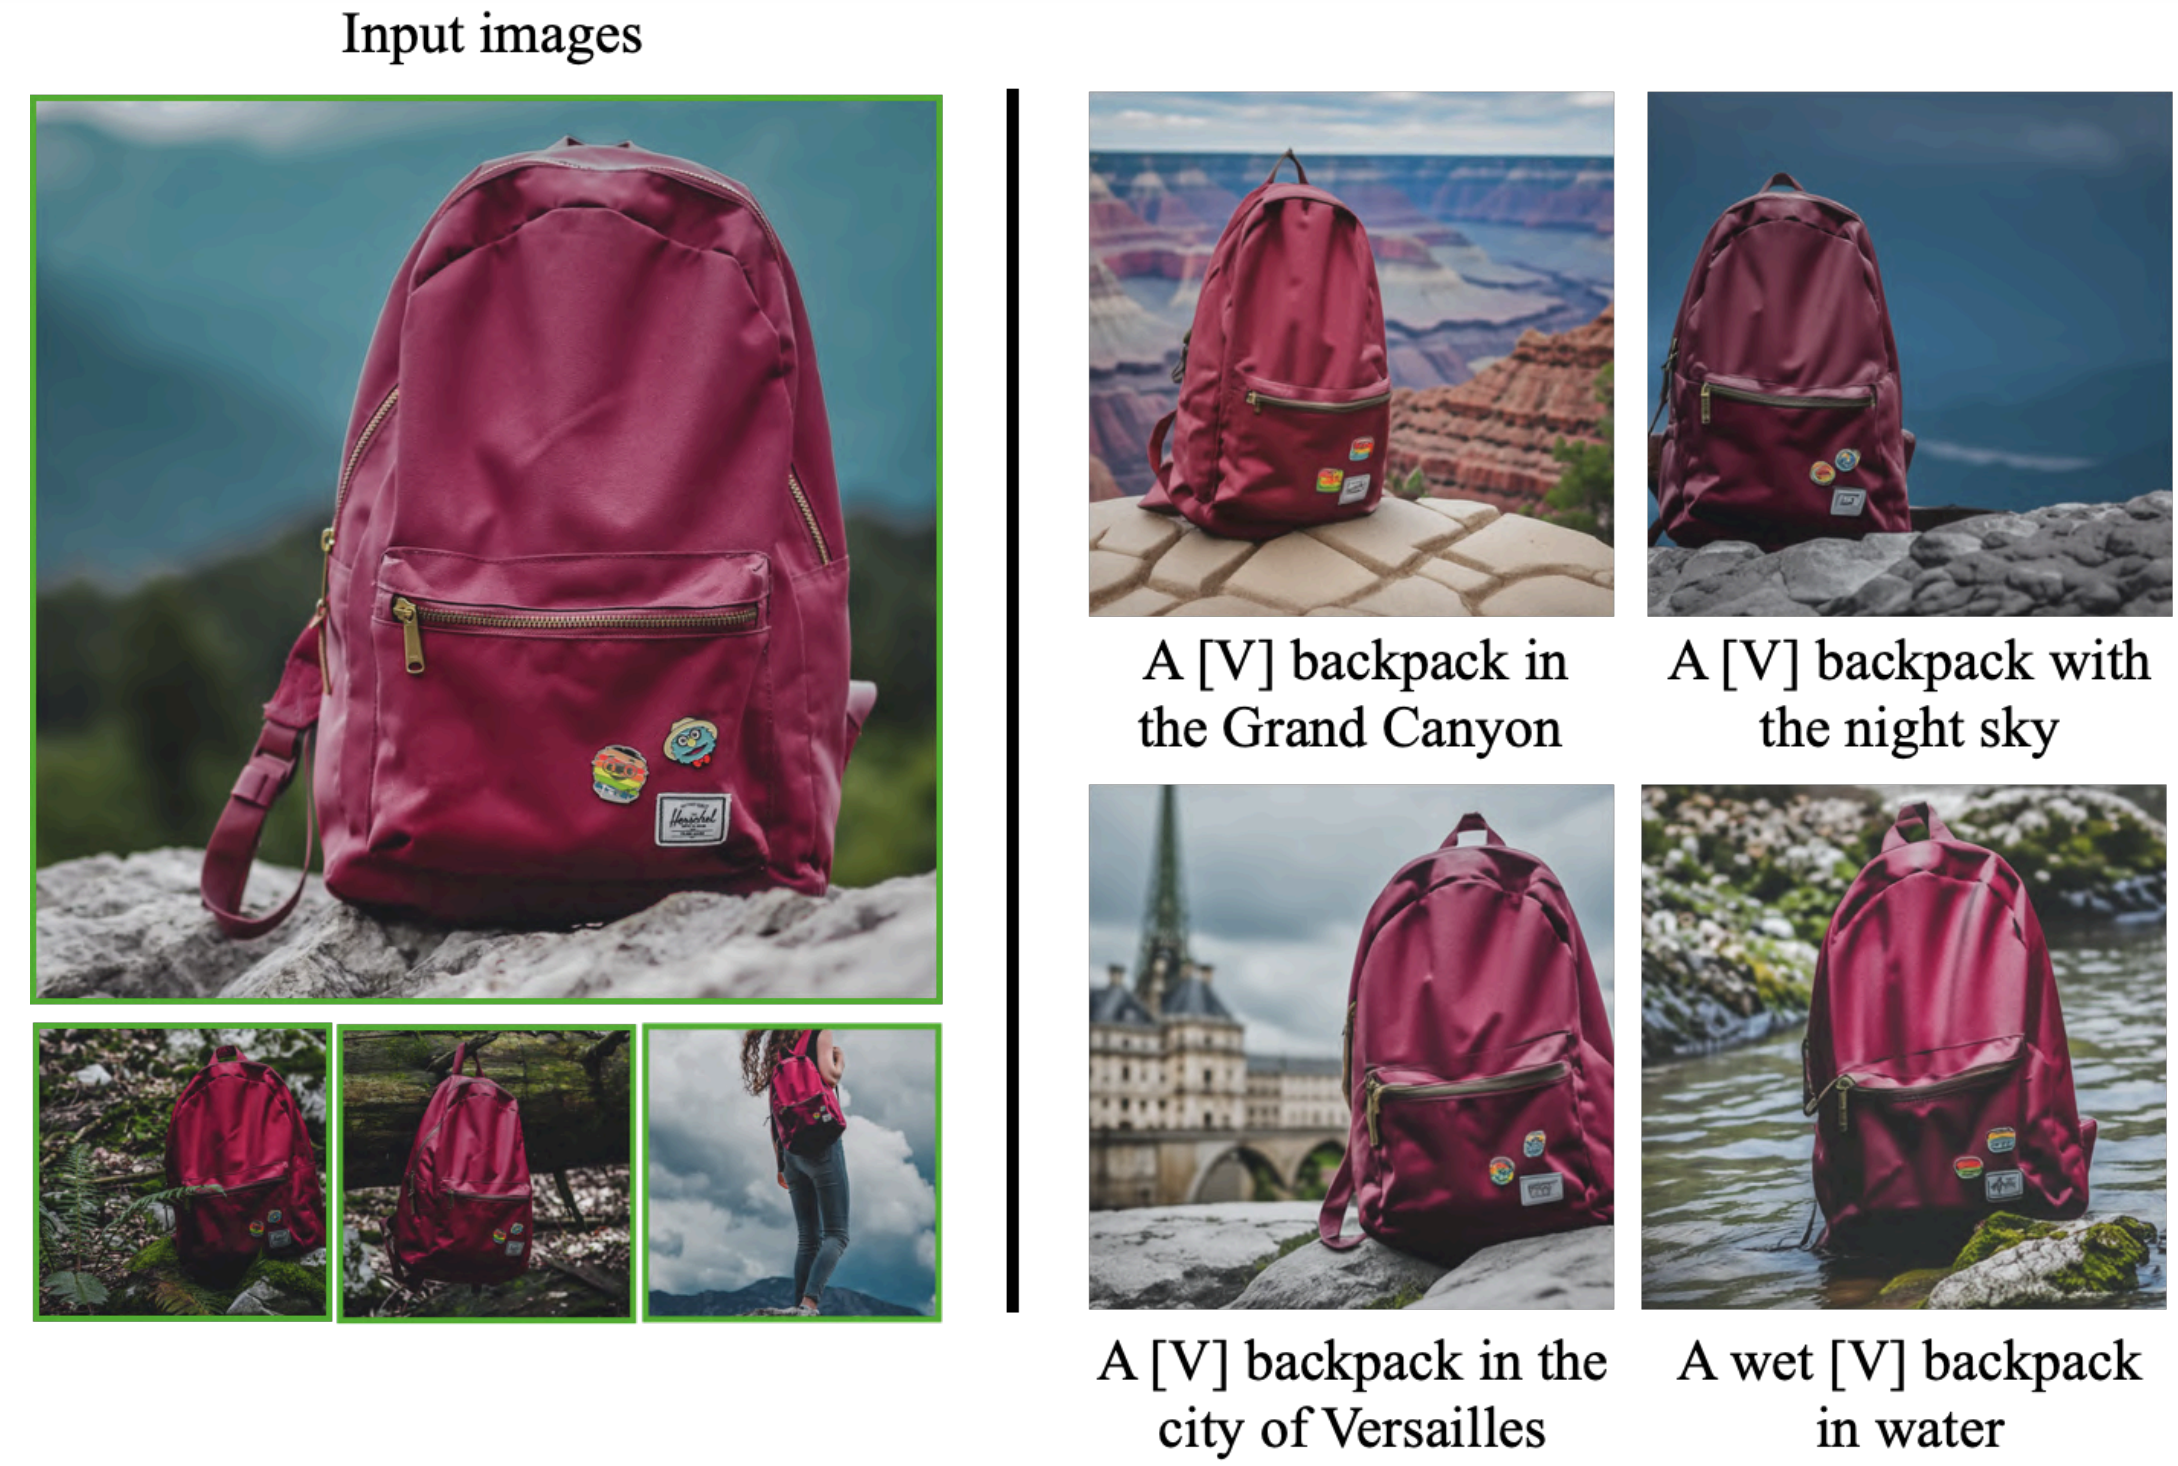
-
기본 시각적 개념의 예술적 렌더링을 생성하기
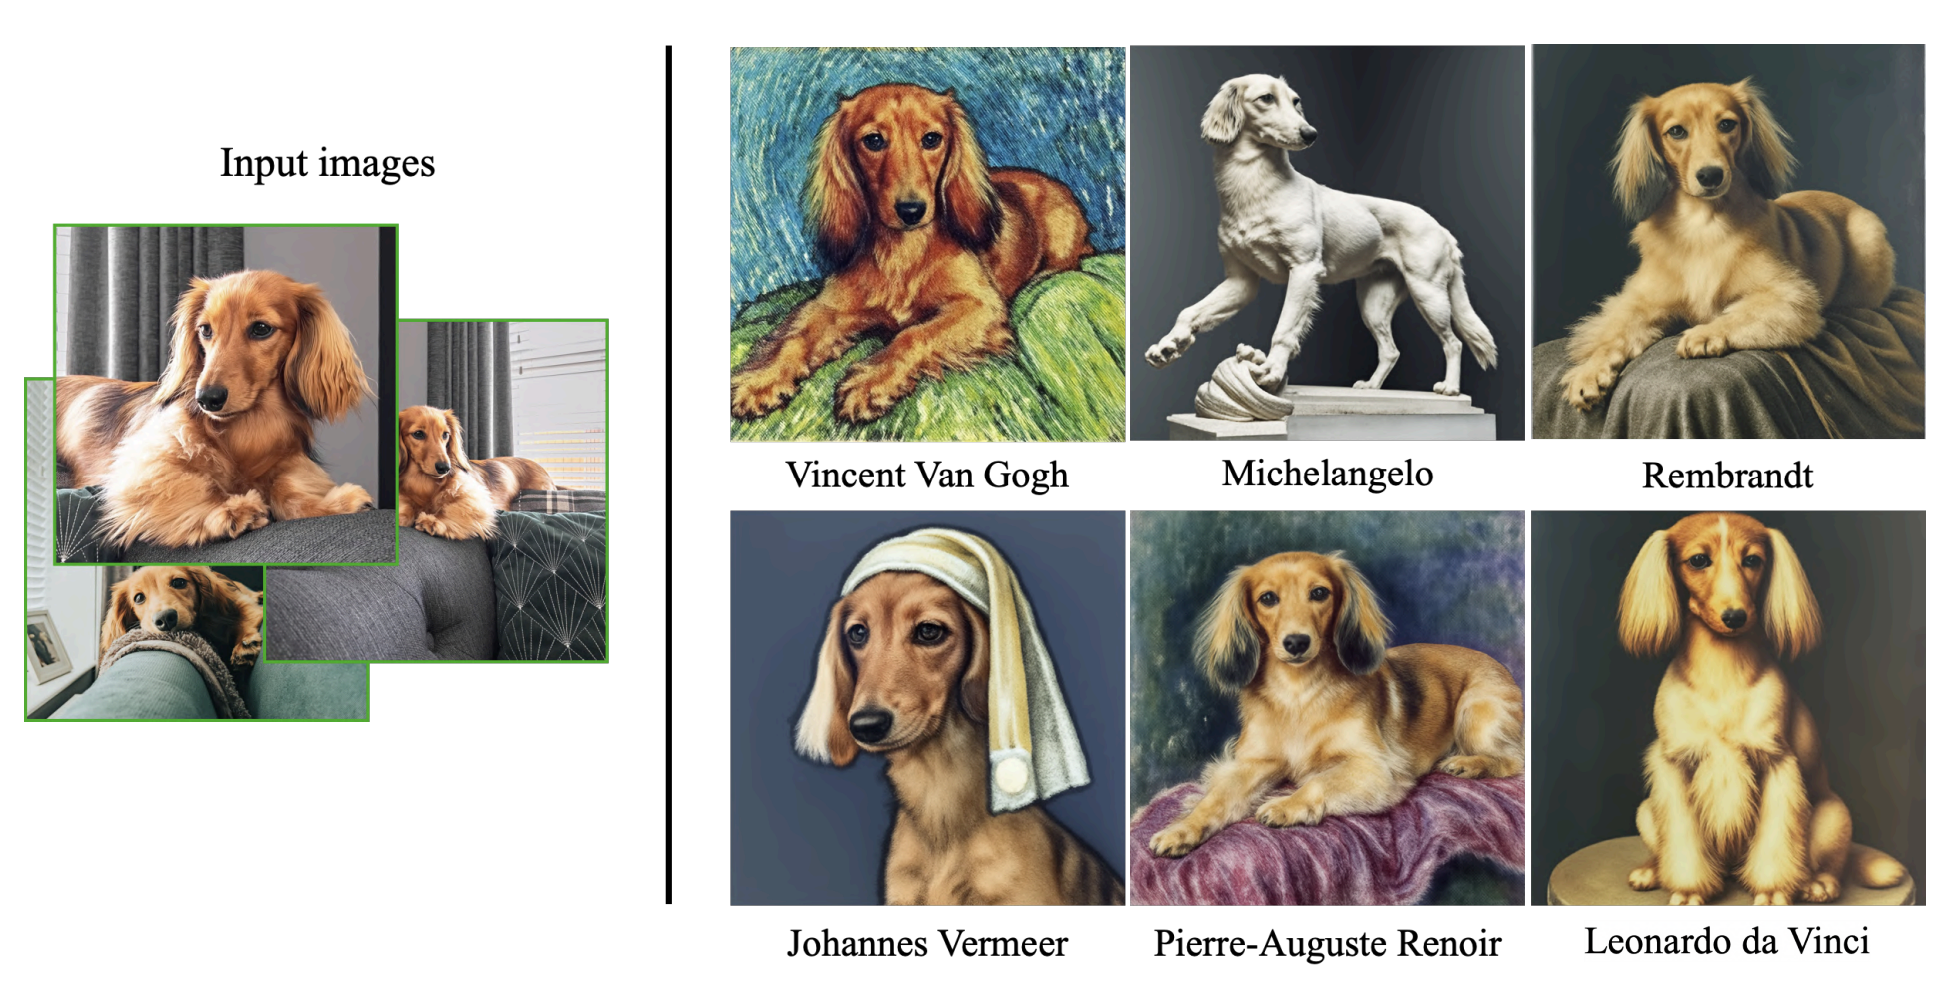
그리고 다른 많은 응용을 할 수 있습니다. 이와 관련하여 원본 DreamBooth 논문을 확인해 보시기 바랍니다.
인스턴스 및 클래스 이미지 다운로드
DreamBooth는 “사전 보존(prior preservation)”이라는 기술을 사용하여, 미세 조정된 모델이 도입하는 시각적 개념의 일부 사전 의미(prior semantics)를 여전히 보존할 수 있도록, 트레이닝 절차를 의미 있게 안내합니다. “사전 보존”이라는 개념에 대해 자세히 알아보려면, 이 문서를 참조하세요.
여기서, DreamBooth에 특정한 몇 가지 핵심 용어를 소개할 필요가 있습니다.
- 고유 클래스 (Unique class): 예로는 “개”, “사람” 등이 있습니다. 이 예에서는, “개”를 사용합니다.
- 고유 식별자 (Unique identifier): “인스턴스 프롬프트”를 형성하는 동안, 고유 클래스 앞에 붙는 고유 식별자입니다. 이 예에서는, 이 고유 식별자로 “sks”를 사용합니다.
- 인스턴스 프롬프트 (Instance prompt): “인스턴스 이미지”를 가장 잘 설명하는 프롬프트를 나타냅니다. 프롬프트의 예로는 “f”a photo of {unique_id} {unique_class}”가 있습니다. 따라서, 이 예에서는 “a photo of sks dog”가 됩니다.
- 클래스 프롬프트 (Class prompt): 고유 식별자가 없는 프롬프트를 나타냅니다. 이 프롬프트는 사전 보존을 위해 “클래스 이미지”를 생성하는 데 사용됩니다. 예를 들어, 이 프롬프트는 “개 사진”입니다.
- 인스턴스 이미지 (Instance images): 가르치려는 시각적 개념을 나타내는 이미지, 즉 “인스턴스 프롬프트”를 나타냅니다. 이 숫자는 일반적으로 3~5개에 불과합니다. 일반적으로 이러한 이미지는 직접 수집합니다.
- 클래스 이미지 (Class images): DreamBooth 트레이닝에서 사전 보존을 사용하기 위해, “클래스 프롬프트”를 사용하여 생성된 이미지를 나타냅니다. 이러한 클래스 이미지를 생성하기 위해, 미세 조정하기 전에 사전 트레이닝된 모델을 활용합니다. 일반적으로, 200~300개의 클래스 이미지로 충분합니다.
코드에서, 이 생성 과정은 매우 간단해 보입니다.
from tqdm import tqdm
import numpy as np
import hashlib
import keras_cv
import PIL
import os

class_images_dir = "class-images"
os.makedirs(class_images_dir, exist_ok=True)

model = keras_cv.models.StableDiffusion(img_width=512, img_height=512, jit_compile=True)

class_prompt = "a photo of dog"
num_imgs_to_generate = 200
for i in tqdm(range(num_imgs_to_generate)):
    images = model.text_to_image(
        class_prompt,
        batch_size=3,
    )
    idx = np.random.choice(len(images))
    selected_image = PIL.Image.fromarray(images[idx])
    hash_image = hashlib.sha1(selected_image.tobytes()).hexdigest()
    image_filename = os.path.join(class_images_dir, f"{hash_image}.jpg")
    selected_image.save(image_filename)
이 예제의 런타임을 짧게 유지하기 위해, 이 예제의 작성자는 이 노트북을 사용하여, 일부 클래스 이미지를 생성했습니다.
참고 사전 보존은 DreamBooth에서 사용되는 선택적 기술이지만, 생성된 이미지의 품질을 개선하는 데 거의 항상 도움이 됩니다.
instance_images_root = tf.keras.utils.get_file(
    origin="https://huggingface.co/datasets/sayakpaul/sample-datasets/resolve/main/instance-images.tar.gz",
    untar=True,
)
class_images_root = tf.keras.utils.get_file(
    origin="https://huggingface.co/datasets/sayakpaul/sample-datasets/resolve/main/class-images.tar.gz",
    untar=True,
)
이미지 시각화
먼저, 이미지 경로를 로드해 보겠습니다.
instance_image_paths = list(paths.list_images(instance_images_root))
class_image_paths = list(paths.list_images(class_images_root))
그런 다음, 경로에서 이미지를 로드합니다.
def load_images(image_paths):
    images = [np.array(keras.utils.load_img(path)) for path in image_paths]
    return images
그리고, 로드된 이미지를 그리기 위해 유틸리티 함수를 사용합니다.
def plot_images(images, title=None):
    plt.figure(figsize=(20, 20))
    for i in range(len(images)):
        ax = plt.subplot(1, len(images), i + 1)
        if title is not None:
            plt.title(title)
        plt.imshow(images[i])
        plt.axis("off")
인스턴스 이미지:
plot_images(load_images(instance_image_paths[:5]))

클래스 이미지:
plot_images(load_images(class_image_paths[:5]))

데이터세트 준비
데이터 세트 준비에는 두 단계가 포함됩니다. (1) 캡션 준비, (2) 이미지 처리.
캡션 준비
# 사전 보존을 사용하고 있으므로,
# 사용하는 인스턴스 이미지의 수를 맞춰야 합니다.
# 인스턴스 이미지 경로를 반복하기만 하면 됩니다.
new_instance_image_paths = []
for index in range(len(class_image_paths)):
    instance_image = instance_image_paths[index % len(instance_image_paths)]
    new_instance_image_paths.append(instance_image)

# 우리는 단지 이미지 당 프롬프트 / 캡션을 반복할 뿐입니다.
unique_id = "sks"
class_label = "dog"

instance_prompt = f"a photo of {unique_id} {class_label}"
instance_prompts = [instance_prompt] * len(new_instance_image_paths)

class_prompt = f"a photo of {class_label}"
class_prompts = [class_prompt] * len(class_image_paths)
다음으로, 컴퓨팅을 절약하기 위해 프롬프트를 임베드합니다.
import itertools

# 패딩 토큰과 최대 프롬프트 길이는 텍스트 인코더에 따라 다릅니다.
# 다른 텍스트 인코더를 사용하는 경우, 이에 따라 변경해야 합니다.
padding_token = 49407
max_prompt_length = 77

# 토크나이저를 로드합니다.
tokenizer = keras_cv.models.stable_diffusion.SimpleTokenizer()

# 토큰을 토큰화하고 패딩하는 메서드.
def process_text(caption):
    tokens = tokenizer.encode(caption)
    tokens = tokens + [padding_token] * (max_prompt_length - len(tokens))
    return np.array(tokens)


# 토큰화된 캡션을 배열로 정리합니다.
tokenized_texts = np.empty(
    (len(instance_prompts) + len(class_prompts), max_prompt_length)
)

for i, caption in enumerate(itertools.chain(instance_prompts, class_prompts)):
    tokenized_texts[i] = process_text(caption)


# 또한 트레이닝 중 메모리를 절약하기 위해, 텍스트 임베딩을 미리 계산합니다.
POS_IDS = tf.convert_to_tensor([list(range(max_prompt_length))], dtype=tf.int32)
text_encoder = keras_cv.models.stable_diffusion.TextEncoder(max_prompt_length)

gpus = tf.config.list_logical_devices("GPU")

# 계산이 GPU에서 수행되도록 합니다.
# GPU가 있는 경우, 자동으로 수행된다는 점에 유의하세요.
# 이 예는 더 명확하게 수행하는 방법을 보여주기 위한 것입니다.
with tf.device(gpus[0].name):
    embedded_text = text_encoder(
        [tf.convert_to_tensor(tokenized_texts), POS_IDS], training=False
    ).numpy()

# text_encoder가 GPU 공간을 차지하지 않도록 합니다.
del text_encoder
이미지 준비
resolution = 512
auto = tf.data.AUTOTUNE

augmenter = keras.Sequential(
    layers=[
        keras_cv.layers.CenterCrop(resolution, resolution),
        keras_cv.layers.RandomFlip(),
        keras.layers.Rescaling(scale=1.0 / 127.5, offset=-1),
    ]
)


def process_image(image_path, tokenized_text):
    image = tf.io.read_file(image_path)
    image = tf.io.decode_png(image, 3)
    image = tf.image.resize(image, (resolution, resolution))
    return image, tokenized_text


def apply_augmentation(image_batch, embedded_tokens):
    return augmenter(image_batch), embedded_tokens


def prepare_dict(instance_only=True):
    def fn(image_batch, embedded_tokens):
        if instance_only:
            batch_dict = {
                "instance_images": image_batch,
                "instance_embedded_texts": embedded_tokens,
            }
            return batch_dict
        else:
            batch_dict = {
                "class_images": image_batch,
                "class_embedded_texts": embedded_tokens,
            }
            return batch_dict

    return fn


def assemble_dataset(image_paths, embedded_texts, instance_only=True, batch_size=1):
    dataset = tf.data.Dataset.from_tensor_slices((image_paths, embedded_texts))
    dataset = dataset.map(process_image, num_parallel_calls=auto)
    dataset = dataset.shuffle(5, reshuffle_each_iteration=True)
    dataset = dataset.batch(batch_size)
    dataset = dataset.map(apply_augmentation, num_parallel_calls=auto)

    prepare_dict_fn = prepare_dict(instance_only=instance_only)
    dataset = dataset.map(prepare_dict_fn, num_parallel_calls=auto)
    return dataset
데이터세트 모으기
instance_dataset = assemble_dataset(
    new_instance_image_paths,
    embedded_text[: len(new_instance_image_paths)],
)
class_dataset = assemble_dataset(
    class_image_paths,
    embedded_text[len(new_instance_image_paths) :],
    instance_only=False,
)
train_dataset = tf.data.Dataset.zip((instance_dataset, class_dataset))
모양 확인
이제 데이터 세트가 준비되었으니, 그 안에 무엇이 있는지 잠깐 확인해 보겠습니다.
sample_batch = next(iter(train_dataset))
print(sample_batch[0].keys(), sample_batch[1].keys())

for k in sample_batch[0]:
    print(k, sample_batch[0][k].shape)

for k in sample_batch[1]:
    print(k, sample_batch[1][k].shape)
dict_keys(['instance_images', 'instance_embedded_texts']) dict_keys(['class_images', 'class_embedded_texts'])
instance_images (1, 512, 512, 3)
instance_embedded_texts (1, 77, 768)
class_images (1, 512, 512, 3)
class_embedded_texts (1, 77, 768)
트레이닝하는 동안, 이러한 키를 사용하여 이미지와 텍스트 임베딩을 수집하고 이에 따라 연결합니다.
DreamBooth 트레이닝 루프
DreamBooth 트레이닝 루프는 Hugging Face의 Diffusers 팀에서 제공하는 이 스크립트에서 많은 영감을 받았습니다. 하지만, 주의해야 할 중요한 차이점이 있습니다. 이 예에서는 UNet(노이즈 예측을 담당하는 모델)만 미세 조정하고, 텍스트 인코더는 미세 조정하지 않습니다. 텍스트 인코더의 추가 미세 조정도 수행하는 구현을 찾고 있다면, 이 저장소를 참조하세요.
import tensorflow.experimental.numpy as tnp


class DreamBoothTrainer(tf.keras.Model):
    # 참조:
    # https://github.com/huggingface/diffusers/blob/main/examples/dreambooth/train_dreambooth.py

    def __init__(
        self,
        diffusion_model,
        vae,
        noise_scheduler,
        use_mixed_precision=False,
        prior_loss_weight=1.0,
        max_grad_norm=1.0,
        **kwargs,
    ):
        super().__init__(**kwargs)

        self.diffusion_model = diffusion_model
        self.vae = vae
        self.noise_scheduler = noise_scheduler
        self.prior_loss_weight = prior_loss_weight
        self.max_grad_norm = max_grad_norm

        self.use_mixed_precision = use_mixed_precision
        self.vae.trainable = False

    def train_step(self, inputs):
        instance_batch = inputs[0]
        class_batch = inputs[1]

        instance_images = instance_batch["instance_images"]
        instance_embedded_text = instance_batch["instance_embedded_texts"]
        class_images = class_batch["class_images"]
        class_embedded_text = class_batch["class_embedded_texts"]

        images = tf.concat([instance_images, class_images], 0)
        embedded_texts = tf.concat([instance_embedded_text, class_embedded_text], 0)
        batch_size = tf.shape(images)[0]

        with tf.GradientTape() as tape:
            # 잠재 공간에 이미지를 프로젝션하고, 샘플을 추출합니다.
            latents = self.sample_from_encoder_outputs(self.vae(images, training=False))
            # 여기서 마법의 숫자에 대해 자세히 알아보세요:
            # https://keras.io/examples/generative/fine_tune_via_textual_inversion/
            latents = latents * 0.18215

            # 잠재(latents)에 추가할 샘플 노이즈입니다.
            noise = tf.random.normal(tf.shape(latents))

            # 각 이미지에 대해 무작위 타임스텝을 샘플링합니다.
            timesteps = tnp.random.randint(
                0, self.noise_scheduler.train_timesteps, (batch_size,)
            )

            # 각 타임스텝의 노이즈 크기에 따라, 잠재(latents)에 노이즈를 추가합니다.
            # (이것은 전방(forward) 확산 과정입니다)
            noisy_latents = self.noise_scheduler.add_noise(
                tf.cast(latents, noise.dtype), noise, timesteps
            )

            # 지금은 샘플링된 노이즈에 따라, 예측 타입에 따른 손실 대상을 구합니다.
            target = noise  # noise_schedule.predict_epsilon == True

            # residual 노이즈를 예측하고, 손실을 계산합니다.
            timestep_embedding = tf.map_fn(
                lambda t: self.get_timestep_embedding(t), timesteps, dtype=tf.float32
            )
            model_pred = self.diffusion_model(
                [noisy_latents, timestep_embedding, embedded_texts], training=True
            )
            loss = self.compute_loss(target, model_pred)
            if self.use_mixed_precision:
                loss = self.optimizer.get_scaled_loss(loss)

        # 확산 모델의 매개변수를 업데이트합니다.
        trainable_vars = self.diffusion_model.trainable_variables
        gradients = tape.gradient(loss, trainable_vars)
        if self.use_mixed_precision:
            gradients = self.optimizer.get_unscaled_gradients(gradients)
        gradients = [tf.clip_by_norm(g, self.max_grad_norm) for g in gradients]
        self.optimizer.apply_gradients(zip(gradients, trainable_vars))

        return {m.name: m.result() for m in self.metrics}

    def get_timestep_embedding(self, timestep, dim=320, max_period=10000):
        half = dim // 2
        log_max_period = tf.math.log(tf.cast(max_period, tf.float32))
        freqs = tf.math.exp(
            -log_max_period * tf.range(0, half, dtype=tf.float32) / half
        )
        args = tf.convert_to_tensor([timestep], dtype=tf.float32) * freqs
        embedding = tf.concat([tf.math.cos(args), tf.math.sin(args)], 0)
        return embedding

    def sample_from_encoder_outputs(self, outputs):
        mean, logvar = tf.split(outputs, 2, axis=-1)
        logvar = tf.clip_by_value(logvar, -30.0, 20.0)
        std = tf.exp(0.5 * logvar)
        sample = tf.random.normal(tf.shape(mean), dtype=mean.dtype)
        return mean + std * sample

    def compute_loss(self, target, model_pred):
        # 노이즈와 model_pred를 두 부분으로 나누고, (Chunk하고)
        # 각 부분의 손실을 따로 계산합니다.
        # 입력의 전반부는 인스턴스 샘플이 있고 후반부는 클래스 샘플이 있으므로,
        # 그에 따라 청킹을 수행합니다.
        model_pred, model_pred_prior = tf.split(
            model_pred, num_or_size_splits=2, axis=0
        )
        target, target_prior = tf.split(target, num_or_size_splits=2, axis=0)

        # 인스턴스 손실을 계산합니다.
        loss = self.compiled_loss(target, model_pred)

        # 사전 손실(prior loss)을 계산합니다.
        prior_loss = self.compiled_loss(target_prior, model_pred_prior)

        # 사전 손실을 인스턴스 손실에 합산합니다.
        loss = loss + self.prior_loss_weight * prior_loss
        return loss

    def save_weights(self, filepath, overwrite=True, save_format=None, options=None):
        # 이 메서드를 재정의하면,
        # 이 트레이너 클래스에서 `ModelCheckpoint` 콜백을 직접 사용할 수 있습니다.
        # 이 경우, 미세 조정 중에 트레이닝하므로, `diffusion_model`만 체크포인트로 사용합니다.
        self.diffusion_model.save_weights(
            filepath=filepath,
            overwrite=overwrite,
            save_format=save_format,
            options=options,
        )

    def load_weights(self, filepath, by_name=False, skip_mismatch=False, options=None):
        # 마찬가지로 `load_weights()`를 재정의하여,
        # 트레이너 클래스 객체에서 직접 호출할 수 있도록 합니다.
        self.diffusion_model.load_weights(
            filepath=filepath,
            by_name=by_name,
            skip_mismatch=skip_mismatch,
            options=options,
        )
트레이너 초기화
# 텐서 코어가 있는 GPU를 사용하지 않는 경우, 주석 처리하세요.
tf.keras.mixed_precision.set_global_policy("mixed_float16")

use_mp = True  # 텐서 코어가 있는 GPU를 사용하지 않는 경우, False로 설정하세요.

image_encoder = keras_cv.models.stable_diffusion.ImageEncoder()
dreambooth_trainer = DreamBoothTrainer(
    diffusion_model=keras_cv.models.stable_diffusion.DiffusionModel(
        resolution, resolution, max_prompt_length
    ),
    # 인코더에서 최상위 레이어를 제거하면, 분산이 제거되고 평균만 반환됩니다.
    vae=tf.keras.Model(
        image_encoder.input,
        image_encoder.layers[-2].output,
    ),
    noise_scheduler=keras_cv.models.stable_diffusion.NoiseScheduler(),
    use_mixed_precision=use_mp,
)

# 이러한 하이퍼파라미터는 Hugging Face의 이 튜토리얼에서 나왔습니다.
# https://github.com/huggingface/diffusers/tree/main/examples/dreambooth
learning_rate = 5e-6
beta_1, beta_2 = 0.9, 0.999
weight_decay = (1e-2,)
epsilon = 1e-08

optimizer = tf.keras.optimizers.experimental.AdamW(
    learning_rate=learning_rate,
    weight_decay=weight_decay,
    beta_1=beta_1,
    beta_2=beta_2,
    epsilon=epsilon,
)
dreambooth_trainer.compile(optimizer=optimizer, loss="mse")
트레이닝!
먼저, 트레이닝에 필요한 에포크 수를 계산합니다.
num_update_steps_per_epoch = train_dataset.cardinality()
max_train_steps = 800
epochs = math.ceil(max_train_steps / num_update_steps_per_epoch)
print(f"Training for {epochs} epochs.")
Training for 4 epochs.
그리고, 트레이닝을 시작합니다!
ckpt_path = "dreambooth-unet.h5"
ckpt_callback = tf.keras.callbacks.ModelCheckpoint(
    ckpt_path,
    save_weights_only=True,
    monitor="loss",
    mode="min",
)
dreambooth_trainer.fit(train_dataset, epochs=epochs, callbacks=[ckpt_callback])
Epoch 1/4
200/200 [==============================] - 301s 462ms/step - loss: 0.1203
Epoch 2/4
200/200 [==============================] - 94s 469ms/step - loss: 0.1139
Epoch 3/4
200/200 [==============================] - 94s 469ms/step - loss: 0.1016
Epoch 4/4
200/200 [==============================] - 94s 469ms/step - loss: 0.1231

<keras.callbacks.History at 0x7f19726600a0>
실험과 추론
우리는 이 예제의 약간 수정된 버전으로 다양한 실험을 했습니다. 우리의 실험은 이 저장소를 기반으로 하며, Hugging Face의 이 블로그 게시물에서 영감을 받았습니다.
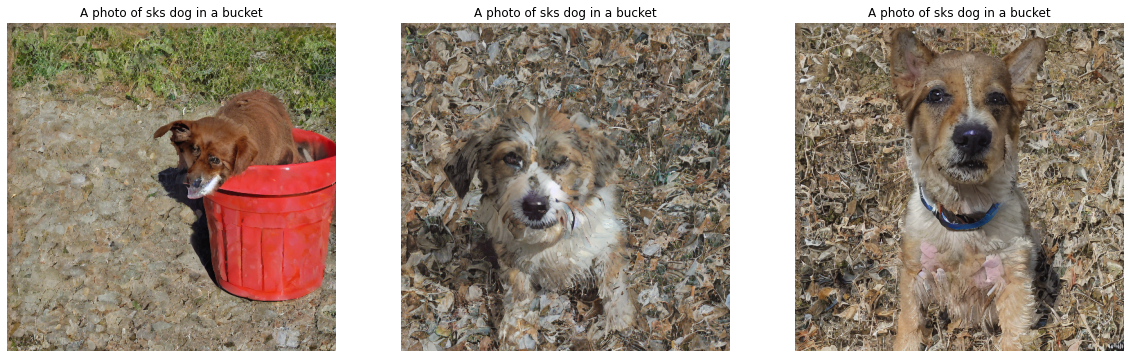
먼저, 미세 조정된 체크포인트를 사용하여, 추론을 실행하는 방법을 살펴보겠습니다.
# 새로운 Stable Diffusion 모델을 초기화합니다.
dreambooth_model = keras_cv.models.StableDiffusion(
img_width=resolution, img_height=resolution, jit_compile=True
)
dreambooth_model.diffusion_model.load_weights(ckpt_path)
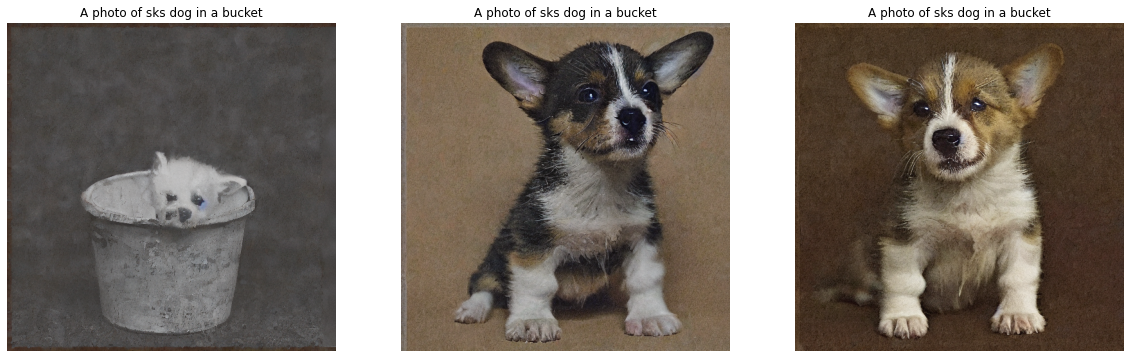
# 프롬프트에서 고유 식별자와 클래스가 어떻게 사용되었는지 주목하세요.
prompt = f"A photo of {unique_id} {class_label} in a bucket"
num_imgs_to_gen = 3
images_dreamboothed = dreambooth_model.text_to_image(prompt, batch_size=num_imgs_to_gen)
plot_images(images_dreamboothed, prompt)
By using this model checkpoint, you acknowledge that its usage is subject to the terms of the CreativeML Open RAIL-M license at https://raw.githubusercontent.com/CompVis/stable-diffusion/main/LICENSE
50/50 [==============================] - 42s 160ms/step
이제, 우리가 UNet과 함께 텍스트 인코더를 미세 조정한, 다른 실험에서 체크포인트를 로드해 보겠습니다.
unet_weights = tf.keras.utils.get_file(
    origin="https://huggingface.co/chansung/dreambooth-dog/resolve/main/lr%409e-06-max_train_steps%40200-train_text_encoder%40True-unet.h5"
)
text_encoder_weights = tf.keras.utils.get_file(
    origin="https://huggingface.co/chansung/dreambooth-dog/resolve/main/lr%409e-06-max_train_steps%40200-train_text_encoder%40True-text_encoder.h5"
)

dreambooth_model.diffusion_model.load_weights(unet_weights)
dreambooth_model.text_encoder.load_weights(text_encoder_weights)

images_dreamboothed = dreambooth_model.text_to_image(prompt, batch_size=num_imgs_to_gen)
plot_images(images_dreamboothed, prompt)
Downloading data from https://huggingface.co/chansung/dreambooth-dog/resolve/main/lr%409e-06-max_train_steps%40200-train_text_encoder%40True-unet.h5
3439088208/3439088208 [==============================] - 67s 0us/step
Downloading data from https://huggingface.co/chansung/dreambooth-dog/resolve/main/lr%409e-06-max_train_steps%40200-train_text_encoder%40True-text_encoder.h5
492466760/492466760 [==============================] - 9s 0us/step
50/50 [==============================] - 8s 159ms/step
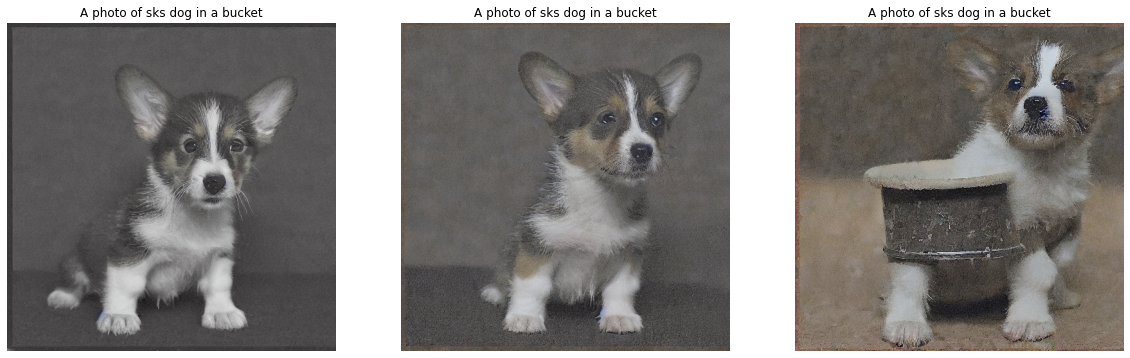
text_to_image()에서 이미지를 생성하는 데 필요한 기본 단계 수는 50 입니다. 이를 100으로 늘려보겠습니다.
images_dreamboothed = dreambooth_model.text_to_image(
    prompt, batch_size=num_imgs_to_gen, num_steps=100
)
plot_images(images_dreamboothed, prompt)
100/100 [==============================] - 16s 159ms/step
다양한 프롬프트로 자유롭게 실험해 보세요. (고유 식별자와 클래스 레이블을 추가하는 것을 잊지 마세요!) 결과가 어떻게 바뀌는지 살펴보세요. 저희 코드베이스와 더 많은 실험 결과를 여기에서 확인해 보세요. 이 블로그 게시물을 읽고 더 많은 아이디어를 얻을 수도 있습니다.
Acknowledgements
- Hugging Face에서 제공한 DreamBooth 예제 스크립트 덕분에 초기 구현을 빠르게 준비하는 데 많은 도움이 되었습니다.
- DreamBooth를 사람의 얼굴에 적용하는 것은 어려울 수 있습니다. 여기에 몇 가지 일반적인 권장 사항을 정리했습니다. 이러한 문제에 도움을 주신 Abhishek Thakur에게 감사드립니다.